How to Repair a Garden Hose: Complete Guide

Author: James Whitmore · Updated: October 2026 · Category: How-To Guides
Before you toss that leaking garden hose in the trash and spend $40–$80 on a replacement, know this: most hose damage is fixable in under 15 minutes with basic tools and parts costing a few dollars. Pinhole leaks, split ends, crushed connectors, and stubborn kinks all have straightforward repairs that extend your hose’s life by years.
This guide covers every common garden hose repair — from quick patches to full connector replacements — so you can get back to watering instead of shopping.
When to Repair vs. Replace
Not every hose is worth saving. Here’s the quick decision framework:
Repair when:
– One or two pinhole leaks or small punctures
– Damaged connector (male or female end)
– Persistent kink in one spot
– Leak at the spigot or nozzle connection
– Hose body is still flexible and otherwise in good shape (no multi-crack UV failure, no delaminating liner)
Replace when:
– Multiple cracks along the hose body (UV degradation)
– Hose walls feel stiff, brittle, or are visibly deteriorating
– More than three separate leak points
– Hose has been repaired multiple times already
– Inner lining is delaminating (water tastes/smells like rubber, or flow is reduced)
If you’re replacing, consider upgrading to an expandable garden hose or a retractable hose reel system that protects the hose from the damage that killed your old one.
Hose lifespan clues (material, warranty, storage)
Garden hose “how long will it last?” answers are not one number. Construction, sun exposure, freeze/drain habits, and dragging abuse matter more than a generic year range — and manufacturer warranty language is a better buyer clue than invented calendar averages.
By construction (plain language, not a lab table):
- Vinyl / PVC — Often the lightest and least expensive jackets. Many vinyl lines publish warranty length on the packaging, not as a single industry-wide year figure. Check the current label for the exact SKU (Teknor Apex states warranty period on packaging).
- Rubber — Heavier, often tougher against abrasion and heat. Some makers back specific rubber SKUs with a lifetime warranty against defects (example: Gilmour Professional Rubber Hose product page lists Warranty: Lifetime). That is a defect warranty, not a promise that every rubber hose lasts forever in the sun.
- Hybrid polymer — Flexzilla / Legacy hybrid garden hoses are marketed for kink resistance and all-weather flex; Flexzilla’s standard garden hose line carries a limited lifetime warranty for defects under normal use. Flexzilla’s separate Pro Water Hose line lists a 10-year limited warranty on its product page — read the exact model page before assuming lifetime coverage.
- Polyurethane (premium specialty) — Eley warrants its polyurethane garden hose for 10 years against defects under normal use (with published exclusions such as constant pressure, UV fading of the cover, animal chew, and freeze).
- Expandable (fabric + latex/TPC core) — Different failure mode (inner tube / fabric shell). This repair guide does not invent expandable year ranges; see the lifespan FAQ already on our expandable garden hose guide and check the maker’s current warranty for the model you buy.
Warranty ≠ calendar lifespan. A lifetime or 10-year warranty covers defects under the maker’s terms — it does not mean every hose in that class will run that many seasons if left pressurized, frozen full of water, or baked in UV on the driveway.
Storage protects hose life more than any patch. Leaving hose coiled on hot concrete or kinked at the spigot shortens service life. A retractable hose reel system keeps the hose off the ground, reduces UV bake and memory kinks, and makes drain-and-store habits easier — that is hose-life protection, not a claim that every reel housing lasts a set number of years. For housing material tradeoffs, see metal vs plastic hose reels.
Tools and Materials You’ll Need
🛒 Recommended Products
Gilmour Hose Repair Kit:
Orbit Hose Mender Kit:
Hose Mender with Clamps:
Shop Hose Repair Kits on Amazon:
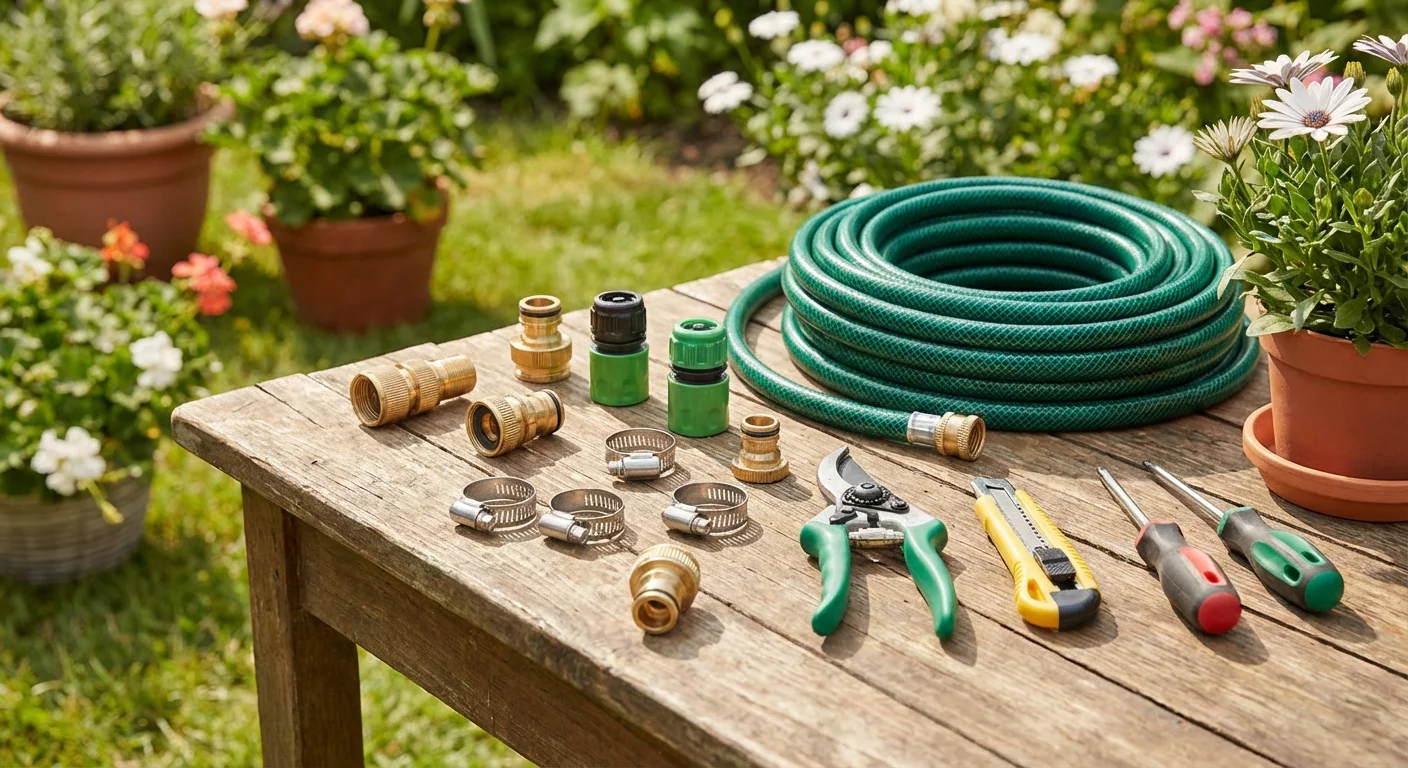
Most repairs require only a few items. Gather everything before you start.
For Patching Holes
- Hose repair tape (self-fusing silicone tape) or a hose mender coupling
- Utility knife or sharp scissors
- Hose clamps (stainless steel worm-drive type)
- Clean rag
For Replacing Connectors
- Replacement hose end (male or female, matching your hose diameter — typically 5/8″ or 3/4″)
- Utility knife
- Flathead screwdriver
- Pliers or adjustable wrench
- Hose clamp or compression fitting (depending on connector type)
For Fixing Kinks
- Heat gun or hair dryer
- Hose straightener/support spring
- Warm water (alternative to heat gun)
Pro Tip: Buy a universal hose repair kit that includes both male and female connectors, a mender coupling, clamps, and washers. These kits cost $8–$15 and cover 90% of repairs you’ll ever need.
Repair #1: Patching Pinhole Leaks and Small Punctures
Pinholes are the most common hose damage — usually caused by dragging over sharp rocks, running over the hose with a mower, or rodent bites during winter storage.
Method A: Self-Fusing Silicone Tape (Quick Fix)
Time: 3 minutes · Difficulty: Easy · Durability: 1–2 seasons
- Turn off water and drain the hose. Release all pressure by opening the nozzle end.
- Dry the damaged area thoroughly with a clean rag. The tape won’t bond to wet surfaces.
- Stretch the tape to about twice its resting length as you wrap. Self-fusing silicone tape bonds to itself, not to the hose — the stretch activates the bond.
- Wrap tightly starting 2 inches before the hole, covering the damage, and extending 2 inches past. Overlap each wrap by half the tape width.
- Add a second layer in the opposite spiral direction for reinforcement.
- Wait 5 minutes before pressurizing. The bond strengthens over 24 hours.
When to use this method: Quick field repairs, tiny pinholes, situations where you need the hose working immediately.
Method B: Hose Mender Coupling (Permanent Fix)
Time: 10 minutes · Difficulty: Moderate · Durability: Permanent
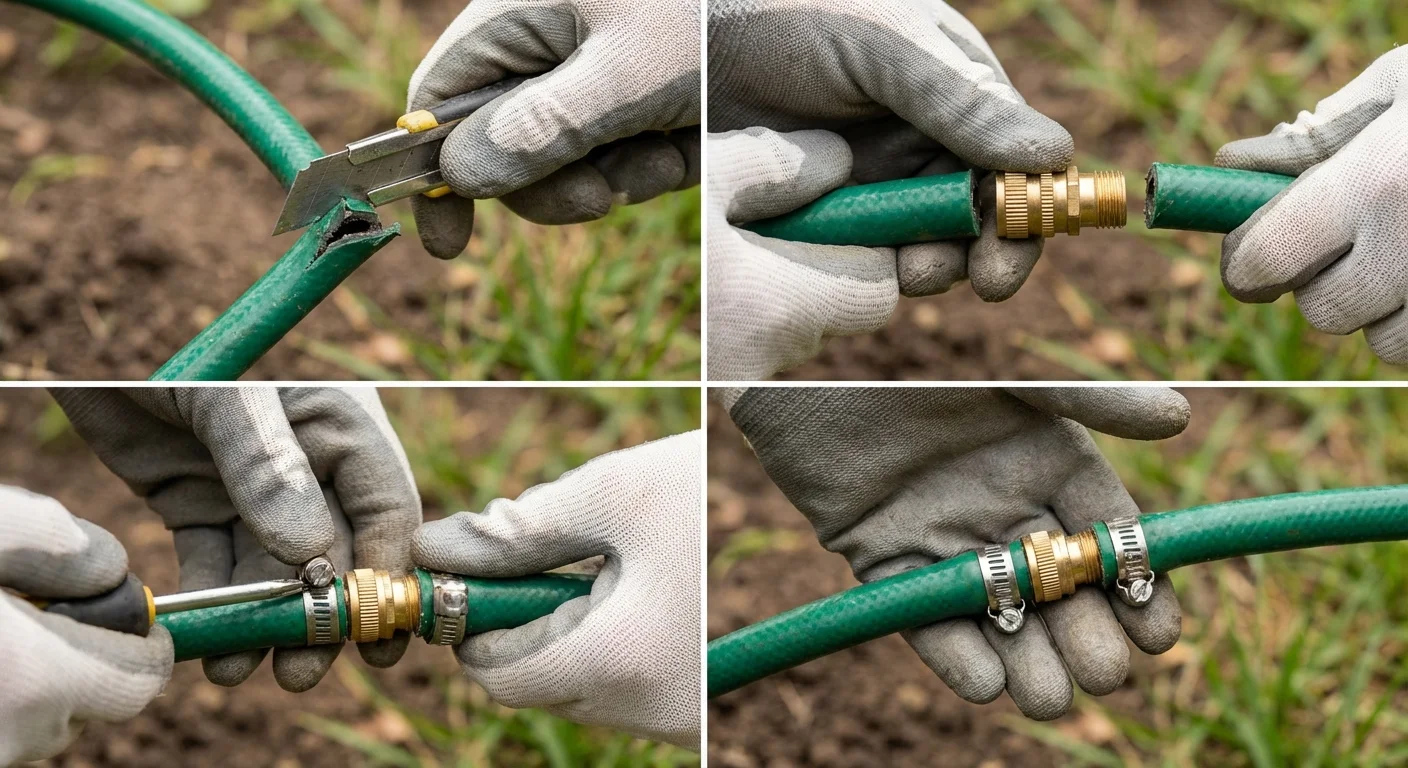
This method cuts out the damaged section and joins the two good ends with a barbed coupling.
- Turn off water and drain the hose completely.
- Cut out the damaged section using a utility knife. Make clean, straight cuts perpendicular to the hose. Remove at least 1 inch on each side of the damage.
- Slide a hose clamp onto each cut end before inserting the mender. Push the clamps back several inches so they’re out of your way.
- Insert the barbed mender coupling into both cut ends. Push firmly — the barbs should seat fully inside the hose. If it’s tight, briefly dip the hose ends in warm water to soften the rubber.
- Slide the hose clamps over the barbed sections and tighten with a screwdriver. Snug, not crushing — you want compression without deforming the hose.
- Test under pressure. Turn on the water and check both clamp points for leaks. Tighten slightly if needed.
Pro Tip: Compression-style mender fittings (no tools required) are available and work well, but worm-drive clamps over barbed fittings create a stronger, more reliable seal — especially for hoses that get dragged around regularly.
Repair #2: Replacing a Damaged Hose Connector
Crushed, cross-threaded, or corroded connectors are the second most common issue. The female end (which attaches to the spigot) fails more often because it takes the most abuse during connect/disconnect cycles.
Replacing a Female Connector (Spigot End)
- Cut off the old connector. Use a utility knife to cut the hose cleanly about 1 inch below where the old fitting was crimped.
- Choose your replacement type:
– Clamp-on: Barbed insert + external hose clamp. Most reliable.
– Compression: Threaded collar that squeezes onto the hose. No tools required but slightly less durable.
– Push-fit: Quick-connect style. Convenient but can pull off under high pressure. - For clamp-on connectors: Slide the clamp onto the hose, push the barbed end of the new connector fully into the hose, position the clamp over the barbed section, and tighten.
- Install a new rubber washer inside the female connector before attaching to the spigot.
- Test the connection under full pressure. Check for leaks at both the crimp point and the threaded spigot connection.
Replacing a Male Connector (Nozzle End)
The process is identical to the female connector — cut, insert, clamp. The only difference is the fitting type (external threads instead of internal).
Sizing matters: Verify your hose diameter before buying connectors. Most residential hoses are 5/8-inch, but 1/2-inch and 3/4-inch exist. Measure the inside diameter of the hose at the cut end.
Pro Tip: When buying replacement connectors, choose brass over plastic. A brass connector costs $2–$3 more and will outlast the hose itself. Plastic connectors crack in cold weather and strip their threads within a season or two. The same principle applies to choosing between metal and plastic hose reels.
Repair #3: Fixing Persistent Kinks
Kinks restrict water flow and, over time, weaken the hose wall at the bend point — eventually causing a crack or split. A hose that kinks in the same spot has developed a “memory” in that section.
Method A: Heat Reshaping
- Straighten the kinked section by hand as much as possible.
- Apply heat using a hair dryer or heat gun on low setting. Hold 6–8 inches away and move continuously — don’t concentrate heat on one spot.
- Hold the hose straight while it cools. Rubber and vinyl hoses will “reset” their shape memory when heated and cooled in a new position.
- For stubborn kinks: Lay the kinked section in direct sunlight for 30 minutes on a hot day, then manually straighten and hold until cool.
Method B: Kink-Prevention Spring
A hose saver spring (coiled wire sleeve) slips over the hose at the kink-prone point and physically prevents the bend radius from getting tight enough to kink.
- Slide the spring over the hose at the trouble spot. Most springs are 6–12 inches long.
- Position it so the kink point is centered within the spring.
- For the spigot connection (the most common kink point), use a 90-degree elbow connector or a spigot-mounted kink eliminator.
Preventing Future Kinks
The best kink fix is prevention. Proper hose storage eliminates most kinking issues:
- Use a hose reel — the consistent coil radius prevents memory kinks. A wall-mounted retractable reel is ideal since it retracts under tension.
- Never store a hose with sharp bends or folded in half.
- Drain before coiling — water weight creates sag points that become kinks.
- Store out of direct sun — UV exposure makes hose walls stiffer and more kink-prone.
For full storage strategies, see our guide on how to store a garden hose without a reel.
Repair #4: Fixing Leaks at the Spigot Connection
If water sprays from the connection point between your hose and the outdoor faucet, the fix is usually simple.
Step 1: Replace the Washer
Remove the hose from the spigot. Inside the female connector, there’s a rubber washer. If it’s cracked, compressed flat, or missing — that’s your leak. Replace it with a new 3/4-inch hose washer (sold in multi-packs for about $2).
Step 2: Check the Threads
If a new washer doesn’t stop the leak, inspect the threads on both the hose connector and the spigot. Look for:
– Cross-threading damage — Visible thread deformation. Replace the connector.
– Mineral buildup — White crusty deposits. Soak in white vinegar for 30 minutes, then scrub with an old toothbrush.
– Corrosion — Green or white oxidation on brass. Light corrosion can be cleaned; heavy corrosion means replacement.
Step 3: Apply Thread Seal Tape (If Needed)
For persistent slow leaks on undamaged threads, wrap 2–3 layers of PTFE (Teflon) tape clockwise around the male threads before reconnecting. This fills microscopic gaps in the thread engagement.
Pro Tip: Always hand-tighten hose connections. Using pliers or wrenches on garden hose threads often causes cross-threading — the #1 cause of connector damage. If you can’t get a leak-free seal by hand, the threads or washer need replacement, not more force.
Repair #5: Fixing a Burst or Split Hose
A burst section (longitudinal split) is more serious than a pinhole but still repairable if the split is under 2 inches.
- Cut out the entire split section plus 1 inch on each side of clean hose.
- Install a barbed mender coupling following the same procedure as Repair #1, Method B.
- Use heavy-duty stainless steel clamps and tighten firmly — burst sections typically occur in areas of higher pressure stress.
If the split is longer than 2 inches or the hose has multiple burst points, replacement is more practical. When replacing, investing in a quality hose reel system protects your new hose from the dragging, UV exposure, and kinking that likely caused the original damage.
Maintenance Tips to Prevent Future Damage
Prevention saves more money than any repair. Follow these practices:
- Drain after every use. Standing water accelerates internal degradation and causes freeze damage in cold months. Our winterization guide covers cold-weather prep in detail.
- Store on a reel or hanger. Coiling on the ground invites rodent damage, UV exposure, and kinks. A hose reel cart keeps hoses organized and off the ground.
- Don’t drag over rough surfaces. Concrete edges, gravel, and sharp landscaping borders are the #1 cause of punctures.
- Release pressure before disconnecting. Turn off the spigot, then open the nozzle to release trapped pressure before unscrewing any connections.
- Inspect seasonally. A 2-minute visual check in spring catches small problems before they become big ones.
- Use a hose guide at corners. Stake-mounted hose guides prevent the hose from dragging across bed edges and foundation corners.
Pro Tip: Keep a small repair kit (mender coupling, two clamps, replacement washers, silicone tape) in your garden shed. Having parts on hand means you fix problems immediately instead of letting small leaks become big splits.
Related Reading
- Beginner’s Guide to Starting a Garden in 2026
- Best Wheelbarrow 2026: Top 7 Picks for Every Yard
- Best Pressure Washer for Home Use 2026: 5 Models Compared
Frequently Asked Questions
Can I use duct tape to fix a leaking garden hose?
Duct tape is a poor choice for hose repair. It doesn’t bond well to wet or damp rubber, degrades quickly under UV exposure, and won’t hold under water pressure. Use self-fusing silicone tape instead — it’s designed for pressurized applications and costs about the same.
How do I know what size replacement connector to buy?
Measure the inside diameter of your hose. Most residential garden hoses are 5/8-inch. Lightweight or compact hoses may be 1/2-inch, while commercial hoses are often 3/4-inch. The connector packaging will specify the hose diameter it fits. When in doubt, bring a cut section of hose to the hardware store for a test fit.
Is it worth repairing a cheap garden hose?
If the hose cost under $15 and has multiple problems, replacement is more practical. But even inexpensive hoses with a single pinhole or bad connector are worth a $5 repair — you’ll get another season or two of use. The real question is whether the hose wall material is still flexible and intact.
Can I connect two garden hoses with a mender coupling?
A mender coupling is designed to rejoin a single cut hose, not to extend length by connecting two separate hoses. For connecting two hoses, use a standard double-female hose connector. Be aware that each connection adds a potential leak point and reduces pressure slightly. For more on hose length, see our guide on choosing the right hose length.
Why does my hose leak at the nozzle even with a new washer?
If a fresh washer doesn’t stop the leak, check for: (1) debris in the threads preventing full engagement, (2) a cracked or deformed connector that can’t compress the washer evenly, (3) a washer that’s the wrong size (some nozzles use a slightly smaller washer than standard 3/4-inch). Also verify you’re not cross-threading — the connector should spin freely by hand before any resistance.
How long does a garden hose repair typically last?
A properly installed barbed mender coupling with stainless steel clamps is essentially permanent — it will outlast the rest of the hose. Self-fusing silicone tape repairs last 1–2 seasons and should be considered temporary. Replacement brass connectors last indefinitely. The weakest link is always the hose material itself, not a quality repair.
Wrapping Up
Most garden hose repairs take less time than driving to the hardware store to buy a replacement. A $5 mender coupling and 10 minutes of work can save you $50+ on a new hose — and keep a perfectly good hose out of the landfill.
Start with the simplest fix that matches your damage type, use quality brass fittings over plastic, and invest in proper storage to prevent future problems. Your hose (and your wallet) will thank you.
For more garden hose care tips, check out our garden hose hacks and browse our complete hose reel buying guides.
Source: EPA lead-free plumbing and safe water fittings standards — EPA lead-free plumbing standards
Frequently Asked Questions
Can I patch a pinhole leak in a garden hose?
Yes — for pinhole leaks, wrap the area with self-fusing silicone tape (not electrical tape) for a quick fix that withstands water pressure. For a permanent repair, cut out the damaged section and insert a brass hose mender coupling ($3–$5), securing each end with stainless steel hose clamps. This repair is stronger than the original hose.
When should I replace a garden hose instead of repairing it?
Replace rather than repair when the hose has multiple leaks within a short section, the jacket is visibly cracked or brittle (sun damage), the hose kinks repeatedly in the same spots despite straightening, or the internal liner has separated (you’ll feel bulges). Calendar “average lifespan” claims vary wildly by construction and care — use the condition checklist above, then check the current manufacturer warranty or packaging for the exact hose you own rather than guessing from a generic year range.
How long do garden hoses last by material?
There is no honest single “garden hose lifespan” number. Material and construction change the failure mode, and care (drain, shade, reel storage, no constant pressure) often matters more than the jacket label.
Use warranty / labeling as the primary sourced clue — not a guessed year average:
- Vinyl / PVC: Warranty length is commonly printed on packaging and varies by SKU. Teknor Apex’s warranty page points buyers to the period stated on the package rather than one universal year figure.
- Rubber: Some premium rubber SKUs publish a lifetime defect warranty on the product page (Gilmour Professional Rubber Hose lists Lifetime). Still inspect for cracking, stiffening, and liner issues — lifetime warranty language is not a substitute for condition checks.
- Hybrid polymer: Flexzilla standard garden hoses carry a limited lifetime defect warranty under normal use (Legacy / Flexzilla product + warranty messaging). Flexzilla Pro Water Hose lists a 10-year limited warranty — confirm the exact model.
- Polyurethane: Eley’s warranty policy warrants its polyurethane garden hose for 10 years under normal use, with published exclusions (including constant pressure and certain UV / animal / freeze damage).
- Expandable: See the existing lifespan FAQ on our expandable garden hose page; that page’s seasonal ranges are not a universal calendar for all hose types.
If you cannot find a clear primary warranty statement for your hose, use the repair-vs-replace condition checklist on this page and check current warranty/labeling before trusting any year figure you see elsewhere.
When should I repair a garden hose vs replace it?
Repair when damage is local and the hose body is still sound: one or two pinholes, a crushed connector, a single memory kink, or a washer leak at the spigot/nozzle. A barbed mender with stainless clamps or a brass replacement end is usually the lasting fix.
Replace when the hose is failing as a system: multiple cracks from UV, a stiff/brittle jacket, more than a few separate leak points, repeated prior repairs, or a delaminating inner liner (bulges, odd taste/smell, reduced flow). At that point patches chase the next weak spot.
Skip calendar-age rules. A well-stored hybrid or rubber hose can outlast a neglected “newer” vinyl hose left in the sun. When you do replace, upgrading storage — especially a retractable hose reel — often prevents the same UV / kink / drag damage from killing the next hose early. Brass ends outlast plastic; the same durability logic shows up when comparing metal and plastic hose reels.
Do retractable hose reels help garden hoses last longer?
They help protect the hose, which is the usual failure point. A retractable reel keeps the hose coiled at a consistent radius, off abrasive ground, and out of some of the worst driveway UV bake and kink memory that splits jackets. Drain after use and follow the maker’s winter guidance — trapped water and freeze damage still kill hose (and fittings) regardless of reel brand.
This is not a claim that every retractable reel housing lasts a set number of years. Reel warranties and hose warranties are separate documents. For reel shopping and mount styles, start with our best retractable hose reel guide; for housing material tradeoffs, see metal vs plastic hose reels.